Eniture's Real Time Shipping Quotes App includes a utility that allows merchants to bulk update the shipping parameters of the products and product variants in their catalogs. This method can be more time-efficient than navigating in and out of the app's user interface, particularly if there are many products.
Eniture Technology also has apps that provide shipping quotes in Shopify with "LTL Freight Quotes" or "Small Package Quotes" in their name. Those products also have an Import CSV Utility, but their instructions differ slightly. Use this link to view instructions for the Import CSV Utility included in Shopify's LTL Freight Quotes and Small Package Quotes apps.
Download the CSV template
While logged into the Admin are of your store, navigate to Apps and click on the DIY Real Time Shipping Quotes.
Click on Import CSV in the app's navigation. Locate and click on the link labeled "template" in the instructions.

Enter your email address when prompted, and then the Send Email button. You should receive the CSV file within a few minutes If you don't see the email in your inbox, check your Junk folder.
Populating the CSV file
Open the CSV file in Excel or a similar application. Each row of the spreadsheet represents one of your products or product variants. The Real Time Shipping Quotes app has many shipping provider integrations. The CSV file can be used for all of them. You only need to import the file once.
Save a copy of the CSV file as a backup, particularly if you have product shipping parameters already present. If you make a mistake with your current update exercise, you can use the backup file to restore your product shipping parameters to their previous state.
Columns A and B contain unique identifiers from Shopify. Do not disturb these fields. The columns between Column B and the column with the heading Quote Method are columns that contain information from Shopify that is provided to help identify the product or product variant represented by the row in the file. They aren't used in the CSV import process. The column with the heading Quote Method and all the columns afterward are relevant to the app and are where your focus will be while populating data for use by the app.
We recommend deleting the rows from the CSV file related to products or product variants that you don't want to update. Doing so will prevent them from being updated in the event you make a mistake. You can also delete columns that you don’t want to update. For example, if you only want to update product/variant weights, your final CSV file needs only contain Column A (Product ID), Column B (Variant ID), and the column with the heading Weight.
Removing data from the field labeled Quote Method and any of the columns afterward has the same effect as removing the data when using the user interface. For example, if the Weight field for a product/variant is populated in the downloaded CSV file, and it is empty (a.k.a. NULL) when the file is uploaded, then the weight of the product/variant is erased.
| Column | Header | Instructions |
| A | Product ID | This column is critical to the import process. Do not remove the column or modify its contents. |
| B | Variant ID | This column is critical to the import process. Do not remove the column or modify its contents. |
| L | Quote Method |
Required. The default shipping method for the item. If you only have the Small Package Quotes app installed, enter S. If you only have the LTL Freight Quotes app installed, enter L. If you have both apps installed, enter S or L depending on which shipping method would be used if the cart contained only one unit of the item and no other items were in the cart. If left blank, the apps will ignore the product. S = Small Package (Parcel) |
| M | Freight Class |
Required only if the LTL Freight Quotes app is installed. If so, you should enter a freight class on all products, even those that will ship small package (parcel) by default. Small package products can be quoted as part of an LTL shipment depending on the content of the cart. Permitted values are: 50, 55, 60, 65, 70, 77.5, 85, 92.5, 100, 110, 125, 150, 175, 200, 225, 250, 300, 400, 500, DensityBased. (Enter "DensityBased" without a space between "Density" and "Based".) If you are unfamiliar with freight classes and need to populate this column, the knowledge base article What is a freight class? is a good resource to start with. |
| N | NMFC | Do not populate this field unless you want to get LTL freight quotes and your pricing tariff requires an NMFC number to get a rate quote. To confirm if this is the case, log into your LTL provider's website and get a rate quote. If you can do so without providing an NMFC number, then leave this field blank. (NMFC numbers can be thought of as a "sub-freight class" and are rarely required for the purpose of obtaining a LTL freight rate quote.) |
| O | Weight |
Required. Enter the weight of the item in pounds. You can can enter a value to the thousandths of a pound. For example, enter 1.125 for an item that weighs 1 pound and 2 ounces or 1 1/8 pounds. There is a column in the CSV file with the heading Variant Grams. It contains what you entered into Shopify to identify the weight of the product. Shopify stores this data in grams. If you’re comfortable with spreadsheet formulas, you can use the data in the Variant Grams column to populate the Weight (this) column. The Excel formula for row 2 of the CSV file would be: =ROUNDUP(J2*0.00220462,3) Once you have the formula entered into the Weight column of your spreadsheet, you can copy it and paste it into all the remaining rows of the spreadsheet. Or use the spreadsheet’s drag-and-fill feature. The weight entered for use by the app does not have to equal the weight entered for Shopify. |
| P | Length |
Enter the length of the item in inches. You can enter a value to the thousandths of an inch. For example, enter 1.125 for an item with a length of 1 1/8 inches. Length is always the longest dimension of the item. Small Package Quotes Length is required if you will be using the Standard Box Sizes feature. If you won’t be using the Standard Box Sizes feature, we still recommend that you enter dimensions since carriers identify the billable weight of a shipment as the greater of the actual or dimensional weight. LTL Freight Quotes
Refer to the section on how to use the user interface to populate the product shipping parameters to determine if you should enter dimensions for items that will ship LTL freight by default. It will indicate if dimensions are required for shipments to certain destinations or the excessive length fee. |
| Q | Width |
Enter the width of the item in inches. You can enter a value to the thousandths of an inch. For example, enter 1.125 for an item with a length of 1 1/8 inches. Small Package Quotes Width is required if you will be using the Standard Box Sizes feature. If you won’t be using the Standard Box Sizes feature, we still recommend that you enter dimensions since carriers identify the billable weight of a shipment as the greater of the actual or dimensional weight. LTL Freight Quotes
Refer to the section on how to use the user interface to populate the product shipping parameters to determine if you should enter dimensions for items that will ship LTL freight by default. It will indicate if dimensions are required for shipments to certain destinations. |
| R | Height |
Enter the height of the item in inches. You can enter a value to the thousandths of an inch. For example, enter 1.125 for an item with a length of 1 1/8 inches. Small Package Quotes Height is required if you will be using the Standard Box Sizes feature. If you won’t be using the Standard Box Sizes feature, we still recommend that you enter dimensions since carriers identify the billable weight of a shipment as the greater of actual or dimensional weight. LTL Freight Quotes
Refer to the section on how to use the user interface to populate the product shipping parameters to determine if you should enter dimensions for items that will ship LTL freight by default. It will indicate if dimensions are required for shipments to certain destinations. |
| S | Dropship Nickname | If the item will ship from a drop ship location, enter its nickname. Leave it blank if the item ships from one of your warehouses. If the drop ship location wasn’t defined previously, it will be created. Read the knowledge base article Warehouses versus Drop Ship locations if you’re unclear about the difference. |
| T | Dropship Zipcode | If the item will ship from a drop ship location, enter its 5 digit ZIP code (US) or 6 character postal code (Canada). If the ZIP code has a leading zero (0), preface it with an apostrophe (i.e. ‘02111). Leave it blank if the item ships from one of your warehouses. If the drop ship location wasn’t defined previously, it will be created. Read the knowledge base article Warehouses versus Drop Ship locations if you’re unclear about the difference. |
| U | Dropship City | If the item will ship from a drop ship location, enter its City. Leave it blank if the item ships from one of your warehouses. If the drop ship location wasn’t defined previously, it will be created. Read the knowledge base article Warehouses versus Drop Ship locations if you’re unclear about the difference. |
| V | Dropship State | If the item will ship from a drop ship location, enter the two character abbreviation for the state or province. Leave it blank if the item ships from one of your warehouses. If the drop ship location wasn’t defined previously, it will be created. Read the knowledge base article Warehouses versus Drop Ship locations if you’re unclear about the difference. |
| W | Dropship Country |
If the item will ship from a drop ship location, enter the two character abbreviation for the country. Leave it blank if the item ships from one of your warehouses. If the drop ship location wasn’t defined previously, it will be created. Read the knowledge base article Warehouses versus Drop Ship locations if you’re unclear about the difference. CA = Canada |
| X | Hazmat |
This setting will be operational only if you are subscribed to a plan which includes the feature. 0 = The item isn’t hazardous material. 1 = The item is hazardous material. An empty field is the equivalent of entering a 0. |
| Y | Markup |
Enter a dollar amount (e.g. 5.00 for $5.00) or a percentage (e.g. 5.0% for five percent) to mark up the shipping charges when this item is in the cart. Leave this field blank if you don’t want the inclusion of this product in the cart to be the reason why the shipping quotes that are returned by the carrier are modified. A dollar amount will be multiplied by the quantity of the item that is in the cart and the result added to the shipping quotes that are returned from the carrier before any markups on the Quote Settings page are applied. A percentage will be applied to the total value of the item in the cart (price x quantity x (1 + markup percentage)) and the result added to the shipping quotes that are returned from the carrier before any markups on the Quote Settings page are applied. |
| Z | Offset Days |
The setting is only relevant if you have the Display estimated delivery date setting enabled on the Quote Settings page. When the app requests shipping quotes, it identifies a ship date. The estimated delivery date is dependent on the ship date. The Quote Settings page has three settings that are applied globally that will alter the ship date so that it aligns with your fulfillment operations. The product-level setting for Fulfillment offset days allows the offset to be different for individual products. The product-level setting for Fulfillment offset days takes precedent over its globally applied counterpart on the Quote Settings page. In cases where the Cart contains multiple products with different Fulfillment offset days, the largest number of offset days is used to adjust the ship date. Enter the number of days to offset the ship date for this product. |
| AA | Boxing Properties |
This setting will be operational only if you have the Standard Box Sizes feature enabled. 0 = (Default) The item will be placed in a box in the orientation specified by its dimensions. The height dimension will dictate the amount of vertical space in the box the item will consume. 1 = The item can be rotated vertically when placed in the box. The item can be laid on its side if doing so will allow for a more efficient packaging solution. 2 = The item ships as its own package. 3 = The item ships as its own package if it is the only item in the Cart. The dimensions entered for the product are used as the dimensions of the box used to ship the item if it is the only item in the Cart and only one of the item is in the Cart. 4 = This item ships as multiple boxes. If the SKU ships as multiple boxes, use this option. You will need to navigate to the Box Sizes tab in the app settings to specify the size and weight of each package. An empty field is the equivalent of entering a 0. |
| AB | Pallet Properties |
This setting will be operational only if you have the Pallet Packing feature enabled. 0 = (Default) The item will be placed on a pallet in the orientation specified by its dimensions. The height dimension will dictate the amount of vertical space on the pallet the item will consume. 1 = The item can be rotated vertically when placed on a pallet. The item can be laid on its side if it allows for a more efficient packaging solution. 2 = The item ships as its own handling unit. 3 = DO NOT USE! Reserved for future use. 4 = This item ships as multiple handling units. If the SKU ships as multiple handling units, use this option. You will need to navigate to the Pallets tab in the app settings to specify the size and weight of each handling unit. |
| AC | Insurance |
Some providers allow for shipment insurance. This setting is used to indicate if the shipment should be insured in the event that the quoting carrier provides the option for insurance. 0 = Don't insure the item. 1 = Insure the item. An empty field is the equivalent of entering a 0. If the shipment contains an item that is insured, then the entire contents of the shipment will be quoted as insured. You can not partially insure a shipment for specific items. |
Saving the CSV File
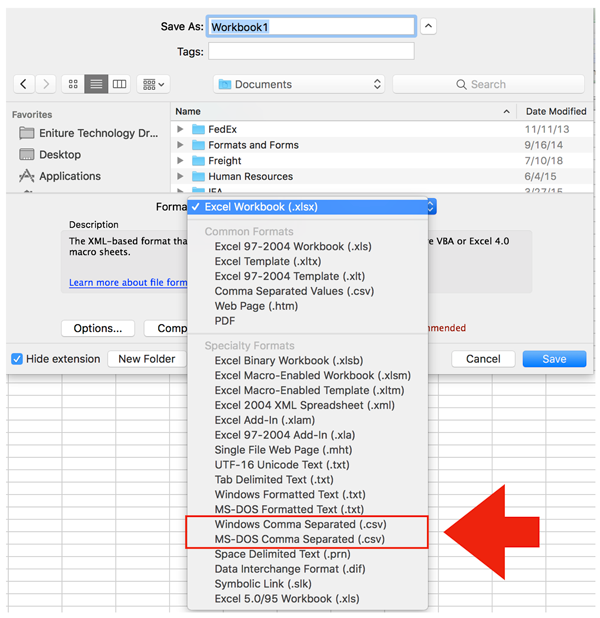
Make sure you save the file as a CSV (comma separated value) file. This is done by using the Save As... entry in the appropriate menu of the spreadsheet application you are using. If you are using a Mac, you need to pick the Windows or MS-DOS specialty formats.
Import the CSV File
Return to the app preferences/settings and click on the Import CSV link.
If your file still has the column headers in the first row (recommended), enable the checkbox for The first row contains column headers.
Next, click on the Choose file button, select the file, and click the Next button.
You'll be presented with a page that will allow you to map the columns in your CSV file to the app's database table. The column on the left represents the columns in the app's database table. The dropdown fields on the right contain the column headings in your CSV file. Unless you renamed the columns after downloading the template, these should be the same.
From the dropdowns, select the column heading that matches the heading in the app's database table. You must match the Product ID and Variant ID columns, but otherwise, you only need to match the columns you want to update. If you only want to update the product weights, then you only need to match the columns for the weight field. You can ignore everything else.
When you complete the matching exercise, click the Next button at the bottom of the page.
The import process will begin. It usually takes just a few minutes for the update to complete. Afterward, you should receive an email notifying you of the import process results. If you don't receive the email notification, use the app's user interface to check if the update occurred. If it didn't, then there was an issue with the file.
If you're having difficulty importing your file, look over the following document:
Trouble importing the CSV file