Eniture Technology's Small Package and LTL Freight quoting apps for Shopify allow merchants to download products to a CSV file so their product shipping parameters can be entered and/or updated en masse and then imported back into the app. Using Excel to enter and/or update many products is much quicker than relying on the user interface provided in the app.
If the product catalog contains over 2500 items, the export will be a ZIP file containing multiple CSV files. For example, if a merchant's catalog contains 10,000 items, the ZIP file will contain 4 CSV files, each having 2500 items (= 2500 items x 4 = 10,000).
It's common for merchants to want to combine the CSV files into a single spreadsheet. The step below will instruct you how to do so quickly and easily on a Mac.
Step 1: Send the CSV export to yourself
Navigate to the app settings and click on the Import CSV tab. In the second paragraph on the page, click on the link labeled template. Enter your email address, and afterward, click the Send button. A few minutes later, you'll receive an email with a Download link. Click the Download link to retrieve the file.
If the email doesn't appear in your Inbox within a few minutes, check your Junk folder.
Step 2: Save the file folder to your Desktop
The download will be deposited in your Downloads folder. There will be two files:
- the original ZIP file;
- an extracted file folder that contains the individual CSV files.
Using Finder, rename the file folder "Merge" and drag it to your Desktop.
You can name the file folder anything and locate where you'd prefer. Using a simple name for the file folder and placing it on your Desktop will make it easier later in these instructions. Adapt the instructions that follow for any alternate choices you make.
Step 3: Open Terminal
Open Terminal on your Mac.
To use Spotlight to open Terminal, press Command+Space Bar (alternatively, press F4) and type in "Terminal" in the search field. Click on "Terminal" in the search results.

You can also open Terminal by navigating to Applications>Utilities>Terminal.
Step 4: Enter the following commands into Terminal
When Terminal opens, it will look similar to the following:

At the cursor, enter the following commands in order, pressing the Return (Enter) key after each line:
- cd ~/Desktop
- cd merge
- cat *.csv >merged.csv
Where...
... In the first command, "Desktop" is where the folder containing the CSV files is located.
... In the second command, "merge" is the name of the folder in which the CSV files are stored.
... In the third command, "merge.csv" is the name of the file you wish to create that contains the combined records of all of the CSV files in the folder.
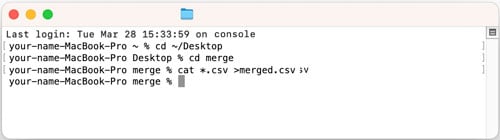
After entering the commands, your Terminal window should resemble the following:
Step 5: Remove header rows from the combined CSV file
Open the folder that contains the CSV files. You should see a file with the name you specified in Step 4 ("merge.csv" if you followed these instructions precisely). Open the file using Excel.
Each CSV file has its own header row, and the header row of each file will exist in the newly combined file. You need to remove all the header rows except one that should be in Row 1 of the file.
In the spreadsheet, select cell A1. Navigate to Edit>Select All using Excel's navigation menu.
Select Data>Sort using Excel's navigation menu. Make sure that the checkbox My list has headers is checked. Using the dropdown for Column, select Product id from the list. Click on the dropdown for Order and select Z to A.
 All the header rows should appear at the top of the spreadsheet. Leave the header row in Row 1, select the others, and delete them from the file.

Step 6: Save the file
Use Excel's Save or Save As options (File menu) to save the changes. Use the file to update the product shipping parameters. Instructions on how to populate the columns in the CSV file are available in the app's User Guide.